Wednesday, March 22, 2006
Isabella means "beautiful one"
A couple of years ago, most of the community service crafting I did was for the neonatal unit of one of our local hospitals. I was up there one day to drop off some things I had made for the little ones, and I happened to see a baby in her tiny crib, wrapped in a small pink knitted blanket that I had made a month or two earlier.
It was the first time I'd ever seen one of the things I'd made in actual use. I had so enjoyed making that little blanket in a lacy feather-and-fan stitch, but that was nothing compared to the joy of seeing this sweet little girl wrapped up in it!
This little baby had had a tough time for many months, but the nurses told me she was finally up to five pounds in weight and nearly ready to go home. Her name was Isabella Rose, and indeed, she looked like the sweetest, most beautiful little rosebud in that tiny pink blankie.
It was an unforgettable moment. And I have thought of that sweet little girl so often in the past couple of years, hoping she was doing well.
OK, fast forward to today.
I was away from my office for a lunch meeting and indulged in a stop at my favorite quilt shop on my way back. I needed some flannel for some receiving blankets I wanted to make for my nieces Amy and Susan, both expecting babies this summer.
Another shopper was also looking at baby flannel and we started to chat, as quilters do. She was working on some projects for her little great-grandsons, and mentioned she also had a great-granddaughter. She mentioned that this little great-granddaughter, now two years old, had been a premature baby and spent several months in the neonatal unit. Her name was Isabella.
By now you can see where this is going. A couple of questions later and I confirmed that Cora's great-grandaughter was the same Isabella Rose that had touched my heart in the fall of 2004. Cora remembered the little pink feather-and-fan blanket and was happy to fill me in on Isabella's doings these days. She's happy, healthy, lively, and according to her proud great-grandma, "a real little corker!"
Neat, isn't it?
I have no pictures of this sweet little girl to share, so the best I can do is tell you about the feather-and-fan stitch and encourage you to try it yourself. Use a baby yarn and size 4 or 5 needles - keep the total size about 20 inches square, so as not to overwhelm a tiny baby - and have fun!
Feather and fan stitch blanket
Cast on any stitches in a multiple of 18 - plus eight stitches, which allows for four stitches of garter stitch border.
Knit four rows.
Begin pattern:
Row 1: K across
Row 2: K4, P until last 4 stitches, K4.
Row 3: K4, *K2 tog 3 times; YO, K1 6 times; K2 tog 3 times* - repeat to last 4 stitches, K4.
Row 4: K across.
Repeat to desired length, and finish off with 4 knit rows for garter stitch edge.
That's all there is to it - and as you knit, may you think lovingly of special little ones like Isabella!
Monday, March 20, 2006
More uses for ugly fabric
- Consider not-so-great fabric for the lining of a fabric purse or tote bag (welcome donations at women's shelters).
- If it's a big, splashy print, cut it into 2 1/2-inch strips and use it as an inner border for a quilt. Use a simple patchwork pattern with "calm" prints or mellow plaids so the strong border doesn't cause a visual riot. Use a quiet print as the wider, outer border and repeat the loud stuff for the binding.
- If you just can't bring yourself to incorporate it into a project, use it to practice free-motion quilting - which, if you've never tried, you really should. It's incredibly easy and helps you get over that whole notion that you have to send all your quilt tops out to longarm quilters to complete. Use your too-embarrassing-to-give-away fabric to sandwich around batting in squares measuring about 18". Put your darning foot on your machine, lower the feed dogs, and practice, practice, practice. Here's a link with some tips. Here's another.
- What about making some small, cushy pads for your local animal shelter? Be sure and call first to see if they can use something like this - they may be unable to launder them, or have other policies that would preclude using something like these. But lots of shelters, especially those that take their adoptable pets out to community events, would welcome some colorful mini-quilts to line the cages of their little adoptees-to-be. Do call, though, and confirm cage sizes as well.
Great ideas, all, and I'm anxious to try a few. Hope this helped inspire a few more ideas.
Saturday, March 18, 2006
New discoveries on vacation
I wasn't expecting to have any inspirations about knitting or other crafts during the cruise. But as we were waiting to disembark on the final day, I pulled a circular needle and yarn out of my tote bag and started fiddling around to pass the time. And almost instantly, a delightful woman named Riva appeared at my side and we started talking about knitting. I had a couple of caps I'd finished earlier in the trip for the Ships Project, and she and her friend Camille were both interested in the pattern and the cause.
Riva's own knitting project was packed safely away in her luggage and she was missing it already. She had been working on a blanket knit in strips, using a diamond pattern that added a lot of textural interest. I asked her to jot down the instructions, for me, and she did. It would make a splendid lap-sized blanket for someone in a wheelchair. And while knitted things take a lot longer to make than quilts, a knitting project can't be beat for portability - so I was glad to have another idea to take on the road. In fact, it sounded so interesting that I immediately ripped out the just-cast-on stitches on my needle and started Riva's pattern.
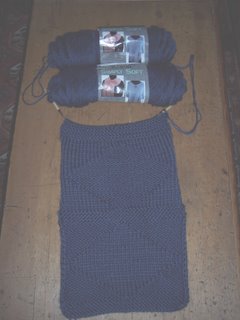
And here's how it looks so far:

The texture doesn't show up well in this photo, but it appears very quickly once you begin knitting. And here's the pattern, courtesy of Riva:
Cast on 35 stitches. Knit every row (garter stitch) for 6 rows (3 ridges).
Begin diamond pattern:
K17, P1, K17
P16, K3, P16
K15, P5, K 15
P14, K7, P14
By now you can see how the pattern is emerging. By increasing the width of your center section by two stitches on every row, you're creating a stockinette/reverse stockinette diamond that looks great on either side.
Keep going in this manner until you finish this row: K3, P29, K3.
Then, start to decrease the width of your diamond:
P4, K27, P4
K5, P25, K5 Etc. etc. etc.
Pretty soon you'll be back at K17, P1, K17…your purled diamond will rise elegantly from its tidy stockinette-stitch background and you will feel so full of yourself, with good reason.
Do another six or so rows of garter stitch and do the whole thing over again!
I decided to flip the pattern on every other diamond in the strip, so I could have a real patchwork look going on. I really have no idea how I'll finish this off. I expect I'll make five or so strips of about seven diamonds each, but who knows? Riva recommends joining the strips with a simple whip-stitch. I forgot to ask her about edging, but I have a feeling I may incorporate a garter-stitch edge into the strips I'll use on either end….then maybe finish the whole thing off with a nice I-cord edging.
By the way, if you're looking for a good place to donate lap-sized blankets or quilts, just call your local Meals on Wheels chapter. Chances are, they'll be delighted to deliver them to some of their clients who could use some extra cheer.
Thursday, March 02, 2006
The good side of ugly
The bright orange batik with the lime-green streaks shooting through it…the print with demonic-looking teddy bears…the mottled, not-quite-brown, not-quite-gray neutral, reminiscent of something that's been left way too long in the refrigerator. If you bought the stuff, you realize you were either caught up in the excitement of a super-markdown sale, or else totally hormonal. If somebody gave it to you, you have probably long since reconsidered the wisdom of that friendship.
I'm going to assume that everyone does have some fabric like this, because I really don't want to believe it's just me. But the discovery I want to share is this…when cut into small pieces, even ugly fabric loses most of its ugliness. In fact, when combined with many other fabrics of an unattractive nature, the whole effect can become pretty darned terrific-looking. And that's important in sewing for community service -- because even though we're often using scraps and seconds by necessity, we should never, and I mean never, donate something that we wouldn't be perfectly proud to give to our own child, or grandparent, or to use ourselves.
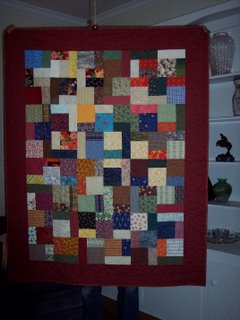
So it was a wonderful surprise to run across this pattern for a scrap block that seems tailor-made for those "what was I thinking" fabrics. When stitched together, the block itself doesn't stand out, but the overall pattern forms a very cheerful mosaic. Individual fabrics - especially those cut into the narrow strips - shed their unsightliness and form quirky little accents here and there. My guild gladly added this to the collection of quilts we donated to our local youth group homes last week.

Lots of the fabrics in this quilt are from the guild's monthly swap of 5-inch charm squares. We have a different theme every month and each June, the theme is "Uglies." We have great fun going through one another's offerings and taking them home as our own. And with just a few swipes of the rotary cutter, many "ugly" charms were charming indeed, forming the perfect spice for this happy quilt.
Do you have other ideas for ugly fabric? Please share them! I'll be gone on vacation through mid-March, but will post, discuss and enjoy as soon as I get back.
And thanks for letting me share my thoughts around this guild project, which was really fun for a lot of us.

