
OK, so something happened today that was really neat. And since I'm never one to tell a short story when a long one will do, I have to wind back the clock first.
A couple of years ago, most of the community service crafting I did was for the neonatal unit of one of our local hospitals. I was up there one day to drop off some things I had made for the little ones, and I happened to see a baby in her tiny crib, wrapped in a small pink knitted blanket that I had made a month or two earlier.
It was the first time I'd ever seen one of the things I'd made in actual use. I had so enjoyed making that little blanket in a lacy feather-and-fan stitch, but that was nothing compared to the joy of seeing this sweet little girl wrapped up in it!
This little baby had had a tough time for many months, but the nurses told me she was finally up to five pounds in weight and nearly ready to go home. Her name was Isabella Rose, and indeed, she looked like the sweetest, most beautiful little rosebud in that tiny pink blankie.
It was an unforgettable moment. And I have thought of that sweet little girl so often in the past couple of years, hoping she was doing well.
OK, fast forward to today.
I was away from my office for a lunch meeting and indulged in a stop at my favorite quilt shop on my way back. I needed some flannel for some receiving blankets I wanted to make for my nieces Amy and Susan, both expecting babies this summer.
Another shopper was also looking at baby flannel and we started to chat, as quilters do. She was working on some projects for her little great-grandsons, and mentioned she also had a great-granddaughter. She mentioned that this little great-granddaughter, now two years old, had been a premature baby and spent several months in the neonatal unit. Her name was Isabella.
By now you can see where this is going. A couple of questions later and I confirmed that Cora's great-grandaughter was the same Isabella Rose that had touched my heart in the fall of 2004. Cora remembered the little pink feather-and-fan blanket and was happy to fill me in on Isabella's doings these days. She's happy, healthy, lively, and according to her proud great-grandma, "a real little corker!"
Neat, isn't it?
I have no pictures of this sweet little girl to share, so the best I can do is tell you about the feather-and-fan stitch and encourage you to try it yourself. Use a baby yarn and size 4 or 5 needles - keep the total size about 20 inches square, so as not to overwhelm a tiny baby - and have fun!
Feather and fan stitch blanket
Cast on any stitches in a multiple of 18 - plus eight stitches, which allows for four stitches of garter stitch border.
Knit four rows.
Begin pattern:
Row 1: K across
Row 2: K4, P until last 4 stitches, K4.
Row 3: K4, *K2 tog 3 times; YO, K1 6 times; K2 tog 3 times* - repeat to last 4 stitches, K4.
Row 4: K across.
Repeat to desired length, and finish off with 4 knit rows for garter stitch edge.
That's all there is to it - and as you knit, may you think lovingly of special little ones like Isabella!
Wednesday, March 22, 2006


Monday, March 20, 2006
More uses for ugly fabric
Quite a few ideas have popped up for good uses of "ugly" fabric, so I'll take a look at some of them tonight. No pictures, except for the fabulous ones that are forming in my mind as I mull over these ideas...
- Consider not-so-great fabric for the lining of a fabric purse or tote bag (welcome donations at women's shelters).
- If it's a big, splashy print, cut it into 2 1/2-inch strips and use it as an inner border for a quilt. Use a simple patchwork pattern with "calm" prints or mellow plaids so the strong border doesn't cause a visual riot. Use a quiet print as the wider, outer border and repeat the loud stuff for the binding.
- If you just can't bring yourself to incorporate it into a project, use it to practice free-motion quilting - which, if you've never tried, you really should. It's incredibly easy and helps you get over that whole notion that you have to send all your quilt tops out to longarm quilters to complete. Use your too-embarrassing-to-give-away fabric to sandwich around batting in squares measuring about 18". Put your darning foot on your machine, lower the feed dogs, and practice, practice, practice. Here's a link with some tips. Here's another.
- What about making some small, cushy pads for your local animal shelter? Be sure and call first to see if they can use something like this - they may be unable to launder them, or have other policies that would preclude using something like these. But lots of shelters, especially those that take their adoptable pets out to community events, would welcome some colorful mini-quilts to line the cages of their little adoptees-to-be. Do call, though, and confirm cage sizes as well.
Great ideas, all, and I'm anxious to try a few. Hope this helped inspire a few more ideas.
Saturday, March 18, 2006
New discoveries on vacation
Ahhhh, vacation. Ten wonderful days of fun, sun, snorkeling, snoozing, dancing and green-apple martinis. Ahhhhhh.
I wasn't expecting to have any inspirations about knitting or other crafts during the cruise. But as we were waiting to disembark on the final day, I pulled a circular needle and yarn out of my tote bag and started fiddling around to pass the time. And almost instantly, a delightful woman named Riva appeared at my side and we started talking about knitting. I had a couple of caps I'd finished earlier in the trip for the Ships Project, and she and her friend Camille were both interested in the pattern and the cause.
Riva's own knitting project was packed safely away in her luggage and she was missing it already. She had been working on a blanket knit in strips, using a diamond pattern that added a lot of textural interest. I asked her to jot down the instructions, for me, and she did. It would make a splendid lap-sized blanket for someone in a wheelchair. And while knitted things take a lot longer to make than quilts, a knitting project can't be beat for portability - so I was glad to have another idea to take on the road. In fact, it sounded so interesting that I immediately ripped out the just-cast-on stitches on my needle and started Riva's pattern.
And here's how it looks so far:
I wasn't expecting to have any inspirations about knitting or other crafts during the cruise. But as we were waiting to disembark on the final day, I pulled a circular needle and yarn out of my tote bag and started fiddling around to pass the time. And almost instantly, a delightful woman named Riva appeared at my side and we started talking about knitting. I had a couple of caps I'd finished earlier in the trip for the Ships Project, and she and her friend Camille were both interested in the pattern and the cause.
Riva's own knitting project was packed safely away in her luggage and she was missing it already. She had been working on a blanket knit in strips, using a diamond pattern that added a lot of textural interest. I asked her to jot down the instructions, for me, and she did. It would make a splendid lap-sized blanket for someone in a wheelchair. And while knitted things take a lot longer to make than quilts, a knitting project can't be beat for portability - so I was glad to have another idea to take on the road. In fact, it sounded so interesting that I immediately ripped out the just-cast-on stitches on my needle and started Riva's pattern.
And here's how it looks so far:
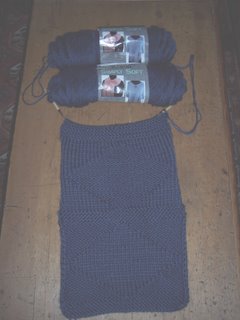
The texture doesn't show up well in this photo, but it appears very quickly once you begin knitting. And here's the pattern, courtesy of Riva:
Cast on 35 stitches. Knit every row (garter stitch) for 6 rows (3 ridges).
Begin diamond pattern:
K17, P1, K17
P16, K3, P16
K15, P5, K 15
P14, K7, P14
By now you can see how the pattern is emerging. By increasing the width of your center section by two stitches on every row, you're creating a stockinette/reverse stockinette diamond that looks great on either side.
Keep going in this manner until you finish this row: K3, P29, K3.
Then, start to decrease the width of your diamond:
P4, K27, P4
K5, P25, K5 Etc. etc. etc.
Pretty soon you'll be back at K17, P1, K17…your purled diamond will rise elegantly from its tidy stockinette-stitch background and you will feel so full of yourself, with good reason.
Do another six or so rows of garter stitch and do the whole thing over again!
I decided to flip the pattern on every other diamond in the strip, so I could have a real patchwork look going on. I really have no idea how I'll finish this off. I expect I'll make five or so strips of about seven diamonds each, but who knows? Riva recommends joining the strips with a simple whip-stitch. I forgot to ask her about edging, but I have a feeling I may incorporate a garter-stitch edge into the strips I'll use on either end….then maybe finish the whole thing off with a nice I-cord edging.
By the way, if you're looking for a good place to donate lap-sized blankets or quilts, just call your local Meals on Wheels chapter. Chances are, they'll be delighted to deliver them to some of their clients who could use some extra cheer.
Thursday, March 02, 2006
The good side of ugly
If you have a sizeable fabric stash, you're bound to have some material that makes you scratch your head later and wonder…what was I thinking?
The bright orange batik with the lime-green streaks shooting through it…the print with demonic-looking teddy bears…the mottled, not-quite-brown, not-quite-gray neutral, reminiscent of something that's been left way too long in the refrigerator. If you bought the stuff, you realize you were either caught up in the excitement of a super-markdown sale, or else totally hormonal. If somebody gave it to you, you have probably long since reconsidered the wisdom of that friendship.
I'm going to assume that everyone does have some fabric like this, because I really don't want to believe it's just me. But the discovery I want to share is this…when cut into small pieces, even ugly fabric loses most of its ugliness. In fact, when combined with many other fabrics of an unattractive nature, the whole effect can become pretty darned terrific-looking. And that's important in sewing for community service -- because even though we're often using scraps and seconds by necessity, we should never, and I mean never, donate something that we wouldn't be perfectly proud to give to our own child, or grandparent, or to use ourselves.
So it was a wonderful surprise to run across this pattern for a scrap block that seems tailor-made for those "what was I thinking" fabrics. When stitched together, the block itself doesn't stand out, but the overall pattern forms a very cheerful mosaic. Individual fabrics - especially those cut into the narrow strips - shed their unsightliness and form quirky little accents here and there. My guild gladly added this to the collection of quilts we donated to our local youth group homes last week.
The bright orange batik with the lime-green streaks shooting through it…the print with demonic-looking teddy bears…the mottled, not-quite-brown, not-quite-gray neutral, reminiscent of something that's been left way too long in the refrigerator. If you bought the stuff, you realize you were either caught up in the excitement of a super-markdown sale, or else totally hormonal. If somebody gave it to you, you have probably long since reconsidered the wisdom of that friendship.
I'm going to assume that everyone does have some fabric like this, because I really don't want to believe it's just me. But the discovery I want to share is this…when cut into small pieces, even ugly fabric loses most of its ugliness. In fact, when combined with many other fabrics of an unattractive nature, the whole effect can become pretty darned terrific-looking. And that's important in sewing for community service -- because even though we're often using scraps and seconds by necessity, we should never, and I mean never, donate something that we wouldn't be perfectly proud to give to our own child, or grandparent, or to use ourselves.
So it was a wonderful surprise to run across this pattern for a scrap block that seems tailor-made for those "what was I thinking" fabrics. When stitched together, the block itself doesn't stand out, but the overall pattern forms a very cheerful mosaic. Individual fabrics - especially those cut into the narrow strips - shed their unsightliness and form quirky little accents here and there. My guild gladly added this to the collection of quilts we donated to our local youth group homes last week.
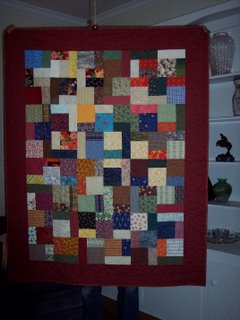
Lots of the fabrics in this quilt are from the guild's monthly swap of 5-inch charm squares. We have a different theme every month and each June, the theme is "Uglies." We have great fun going through one another's offerings and taking them home as our own. And with just a few swipes of the rotary cutter, many "ugly" charms were charming indeed, forming the perfect spice for this happy quilt.
Do you have other ideas for ugly fabric? Please share them! I'll be gone on vacation through mid-March, but will post, discuss and enjoy as soon as I get back.
And thanks for letting me share my thoughts around this guild project, which was really fun for a lot of us.
Tuesday, February 28, 2006
Fleecy foundation means "no batting!"
"Waste not, want not," was one of the things Ma Ingalls used to say in the "Little House on the Prairie" books (and I do mean the Laura Ingalls Wilder books I loved as a kid, not the treacly TV series.) One of my fellow quilt guild members must believe in that aphorism, too. She uses even the narrowest, uneven-est strips of leftover fabric and makes some dandy little blocks that worked perfectly in our guild's community service project.
Yes, we put most of our efforts into designs based on the nine-patch block...but we also wanted to find a way to use other blocks we'd already generated. Mrs. F. had quite a collection of 6-1/2-inch, foundation-pieced blocks in a joyful array of scrappy fabrics. I was intrigued by her technique, and asked her to explain.
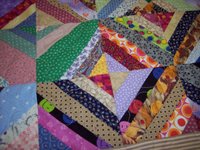
She started by cutting 6-inch squares of fleece interfacing. (Note that it really is a 6-inch square, not 6-1/2.) She foundation-pieced random strips and wedges of fabric diagonally across the fleece, with a little excess around the edges. She trimmed each block back to 6-1/2 inches, carefully centering the fleece and creating a non-fleecy quarter-inch clearance for a non-bulky seam.
We quickly decided the blocks would make terrific baby blankets for some of the little ones at the agency's emergency group home. And indeed they did. Mrs. F. had enough blocks to make several of them...and the fleece interfacing eliminated the need for batting. The quilts were lightweight, wrappable and still cozy....all thanks to scraps that would have otherwise ended up being tossed away.
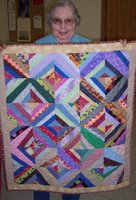
Besides being cute as a button, Mrs. F. also has the finest collection of Janome sewing machines I've ever seen!
Yes, we put most of our efforts into designs based on the nine-patch block...but we also wanted to find a way to use other blocks we'd already generated. Mrs. F. had quite a collection of 6-1/2-inch, foundation-pieced blocks in a joyful array of scrappy fabrics. I was intrigued by her technique, and asked her to explain.

She started by cutting 6-inch squares of fleece interfacing. (Note that it really is a 6-inch square, not 6-1/2.) She foundation-pieced random strips and wedges of fabric diagonally across the fleece, with a little excess around the edges. She trimmed each block back to 6-1/2 inches, carefully centering the fleece and creating a non-fleecy quarter-inch clearance for a non-bulky seam.
We quickly decided the blocks would make terrific baby blankets for some of the little ones at the agency's emergency group home. And indeed they did. Mrs. F. had enough blocks to make several of them...and the fleece interfacing eliminated the need for batting. The quilts were lightweight, wrappable and still cozy....all thanks to scraps that would have otherwise ended up being tossed away.
Besides being cute as a button, Mrs. F. also has the finest collection of Janome sewing machines I've ever seen!
Monday, February 27, 2006
The hardest-working block of all
If you're pulling together a group quilting project for a worthy cause and don't know where to start, look no further than the humble nine-patch block.
For one thing, it's the easiest block pattern imaginable. Even inexperienced quilters, so long as they can sew a quarter-inch seam, can churn out nine-patches by the dozen. In fact, it's so very simple that it's often dismissed when compared to its more elaborately pieced cousins.
But the nine-patch always looks great. Whether surrounded by simple setting squares or more sophisticated piecework, it's a great way to make a totally unique scrap quilt come together. So it was the perfect centerpiece block for the guild's service project for group homes.
You can see one example in yesterday's post. This evening, here's another way to use nine-patches for a great-looking quilt. I had fun doing this one. I took a very scrappy assortment of 6-1/2-inch nine-patch blocks genera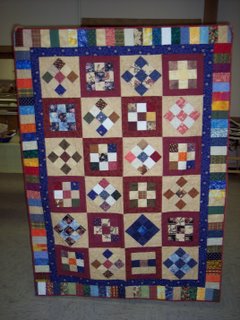 ted by probably six or seven different guild members. I put sashing around a dozen of them with two-inch cut strips. I set a dozen more on point, using tan 5-1/2-inch squares cut diagonally to form the new corners. It was something of an experiment and I trimmed a bit to get them all the same size, but I was really happy with how they looked all stitched together.
For this one, I put a narrow blue border around it, then added a second strip-pieced border out of more 2-1/2-wide scraps. One of my fellow guild members took it from there.
Marti Michell has a great book, 101 Nine-Patch Quilts - a super way to get more inspirations. And don't be afraid to try your own ideas, too. Even if you don't know what final design you're going to use, go ahead and get started on your nine-patches - whichever way you use them, they'll turn out just great!
For one thing, it's the easiest block pattern imaginable. Even inexperienced quilters, so long as they can sew a quarter-inch seam, can churn out nine-patches by the dozen. In fact, it's so very simple that it's often dismissed when compared to its more elaborately pieced cousins.
But the nine-patch always looks great. Whether surrounded by simple setting squares or more sophisticated piecework, it's a great way to make a totally unique scrap quilt come together. So it was the perfect centerpiece block for the guild's service project for group homes.
You can see one example in yesterday's post. This evening, here's another way to use nine-patches for a great-looking quilt. I had fun doing this one. I took a very scrappy assortment of 6-1/2-inch nine-patch blocks genera
 ted by probably six or seven different guild members. I put sashing around a dozen of them with two-inch cut strips. I set a dozen more on point, using tan 5-1/2-inch squares cut diagonally to form the new corners. It was something of an experiment and I trimmed a bit to get them all the same size, but I was really happy with how they looked all stitched together.
For this one, I put a narrow blue border around it, then added a second strip-pieced border out of more 2-1/2-wide scraps. One of my fellow guild members took it from there.
Marti Michell has a great book, 101 Nine-Patch Quilts - a super way to get more inspirations. And don't be afraid to try your own ideas, too. Even if you don't know what final design you're going to use, go ahead and get started on your nine-patches - whichever way you use them, they'll turn out just great!
Sunday, February 26, 2006
Scrap-a-palooza for group homes
A whole lot of fabric scraps turned into something really neat around here during the past few months, and it was exciting to see it all come together on Friday night. My quilt guild's community service project this year was to make quilts for a well-respected local youth services agency that operates 10 groups homes. Some of the homes are for little kids, but most are for teenagers who, for any number of reasons, can't live in their own homes. Our goal was to make a couch-sized quilt for the common areas of five of the homes...giving the kids something to snuggle under while watching TV and adding a comforting visual touch over the backs of otherwise plain couches.
We started the project back in October. Guild members began making 6-1/2-inch nine-patch blocks -- stacks and stacks of them. We concentrated on warm, "homey" colors like maroons, hunter greens, tans, etc. We got together for a few Saturday sessions where we sorted the blocks into color families, then built them out into larger blocks using flying geese, setting squares, etc. We put those larger blocks into kits, and then doled the kits out to members to join and border.
We started the project back in October. Guild members began making 6-1/2-inch nine-patch blocks -- stacks and stacks of them. We concentrated on warm, "homey" colors like maroons, hunter greens, tans, etc. We got together for a few Saturday sessions where we sorted the blocks into color families, then built them out into larger blocks using flying geese, setting squares, etc. We put those larger blocks into kits, and then doled the kits out to members to join and border.
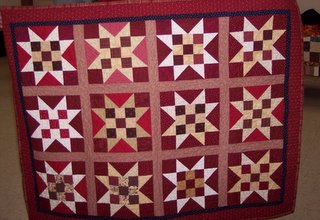
This particular quilt is based on the "Comforts of Home" block from www.scrapquilts.com. We made the nine-patches smaller and flipped the positions of the flying geese around, and it turned out great!
Besides mass-producing nine-patches, we found some great ways to use assorted oddball blocks that lots of us had sitting around, too. Most were totally scrappy - and it's amazing how such a jumble of colors and patterns can come together to look so great!
Each quilt changed hands several times as different members did the layering, basting, quilting and binding. By Friday night's meeting, we had not five, but but 10 completed quilts to present to the agency development director. And five more are in the final stages of production.
We felt great about the results, and when the development director shared stories with the group about some of the challenges the group home kids face, you can bet we'll all be remembering them during their fundraising campaigns, too. So, it was a great learning experience for us all.
So many ideas for community service quilts (I can't stand the term "charity quilts") presented themselves over the course of this project that I'll be jotting them down here over the days to come. I hope the techniques will be useful to you in your own community service projects.
Tuesday, February 21, 2006
Gray slippers nearly done

The gray slipper-socks for The Ships Project are nearly done. I really like the sheen of the Caron Simply Soft. It has a much better texture than lots of other inexpensive acrylics. Soft and cushy...not that awful, scratchy, synthetic feel.
Ellen asks that contributors only mail items to her during the first seven days of the month. This allows her a concentrated period of time to go through all her mail and re-sort the piles, consolidating them into boxes bound for military stations all over the world. Then she can take a breather for a little bit until the whole cycle starts again the next month. So with the mailing dates more than a week away, I've got a little time to make a nice stocking cap with the rest of the yarn.
I can't help but wonder what soldier will end up pulling on these slippers a month or two from now. And I'm extremely grateful that one soldier, in particular, will not be. My brother's son David returned home a few months ago from a year as a medic in Iraq, and is happily back with his wife and their twin sons, who turned two years old last week. Another baby's on the way.
Saturday, February 18, 2006
Ellen runs a tight ship
A work project has me spending much of the weekend at a printing plant outside Boston. So while waiting for pages of text to proofread, I'm knitting. It's been awhile since I've sent anything to Ellen Harpin for The Ships Project, but I'm glad for the chance to be knitting today.
Ellen is an indefatigable woman in Florida who has galvanized knitters all over the country to make slippers, hats and other useful items for men and women serving in the military. She has points of contact not only with troops serving on shipboard, but with ground troops in Iraq and Afghanistan. Over the past four years, Ellen has sent nearly 200,000 volunteer-made items to soldiers -- not just knitted items, but wonderful "cool ties" filled with expandable polymer beads that, when soaked in water, create a tiny personal cooling system that works surprisingly well.
Ellen is extremely well-organized and has specific instructions for her volunteers. For example, she stresses that hats and slippers should be knit in "guy" colors - no pinks and lavenders, even though some women will end up with her shipments. She discourages hats crocheted with two strands -- too thick to fit comfortably under a helmet -- although thinner crocheted styles are OK. And she's specific about hat sizes. Seems lots of folks forget and send items that couldn't possibly fit an adult. In a recent note to her Yahoo mailing list, she said she had received a hat that was about 10 inches in circumference and 12 inches tall...could fit a one-liter water bottle, but not a real person!
I appreciate Ellen's specificity because it indicates she's serious about what she's doing. Some groups just aren't that way, and it's too bad. Vague invitations to contribute "whatever you want" might be well-meant, but unfortunately may end up with people generating a lot of junk in inappropriate colors and useless styles. Ellen will have none of that. So when she gets things that won't be useful, she's quick to remind people to think before they knit. And she gets fabulous results.
Another thing I really like about Ellen's operation is that it is amazingly free of politics. Her volunteers represent a wide variety of people and opinions, but the one thing that unites them is a desire to express support to the individuals who are putting themselves in harm's way because that's what our country has asked them to do. Views on military policy, either way, just don't matter here. But the people do.
Sometime I'll figure out how to imbed links nicely in this text, but for today I'll just type it in and encourage you to learn more about The Ships Project at http://www.theshipsproject.com.
Because slippers for this project need to have cuffs (safety issue, apparently), I decided to slightly modify Joan Hamer's famous Wool-Ease Socks pattern for men. I'm using two strands of Caron Simply Soft in gray, and it's knitting up nicely on size 8 double-pointed bamboo needles. I'm just making the slipper-socks ribbing only a couple of inches deep, instead of the 8 inches of ribbing you'd knit if you were making sock-socks. The pattern is just so easy to follow, and the heel flap is knit in a beautiful Shaker stitch that is so thick and cushy. I'll post some pictures once I'm done - didn't bring my camera with me on this trip.
Oh, and if you've never seen the sock pattern, here it is... http://knitting.about.com/library/mensocks.htm. It's a great way to become acquainted with sock-knitting and techniques like short rows.
Now, back to knitting...oh, and waiting for those pages to proofread.
Ellen is an indefatigable woman in Florida who has galvanized knitters all over the country to make slippers, hats and other useful items for men and women serving in the military. She has points of contact not only with troops serving on shipboard, but with ground troops in Iraq and Afghanistan. Over the past four years, Ellen has sent nearly 200,000 volunteer-made items to soldiers -- not just knitted items, but wonderful "cool ties" filled with expandable polymer beads that, when soaked in water, create a tiny personal cooling system that works surprisingly well.
Ellen is extremely well-organized and has specific instructions for her volunteers. For example, she stresses that hats and slippers should be knit in "guy" colors - no pinks and lavenders, even though some women will end up with her shipments. She discourages hats crocheted with two strands -- too thick to fit comfortably under a helmet -- although thinner crocheted styles are OK. And she's specific about hat sizes. Seems lots of folks forget and send items that couldn't possibly fit an adult. In a recent note to her Yahoo mailing list, she said she had received a hat that was about 10 inches in circumference and 12 inches tall...could fit a one-liter water bottle, but not a real person!
I appreciate Ellen's specificity because it indicates she's serious about what she's doing. Some groups just aren't that way, and it's too bad. Vague invitations to contribute "whatever you want" might be well-meant, but unfortunately may end up with people generating a lot of junk in inappropriate colors and useless styles. Ellen will have none of that. So when she gets things that won't be useful, she's quick to remind people to think before they knit. And she gets fabulous results.
Another thing I really like about Ellen's operation is that it is amazingly free of politics. Her volunteers represent a wide variety of people and opinions, but the one thing that unites them is a desire to express support to the individuals who are putting themselves in harm's way because that's what our country has asked them to do. Views on military policy, either way, just don't matter here. But the people do.
Sometime I'll figure out how to imbed links nicely in this text, but for today I'll just type it in and encourage you to learn more about The Ships Project at http://www.theshipsproject.com.
Because slippers for this project need to have cuffs (safety issue, apparently), I decided to slightly modify Joan Hamer's famous Wool-Ease Socks pattern for men. I'm using two strands of Caron Simply Soft in gray, and it's knitting up nicely on size 8 double-pointed bamboo needles. I'm just making the slipper-socks ribbing only a couple of inches deep, instead of the 8 inches of ribbing you'd knit if you were making sock-socks. The pattern is just so easy to follow, and the heel flap is knit in a beautiful Shaker stitch that is so thick and cushy. I'll post some pictures once I'm done - didn't bring my camera with me on this trip.
Oh, and if you've never seen the sock pattern, here it is... http://knitting.about.com/library/mensocks.htm. It's a great way to become acquainted with sock-knitting and techniques like short rows.
Now, back to knitting...oh, and waiting for those pages to proofread.
Tuesday, February 14, 2006
Bagging it
Tonight was the February meeting of a volunteer sewing group at one of our local hospitals. A group of us have gotten together monthly since last September. We plug in our sewing machines around a conference table and have ourselves some fun for a couple of hours.
When we started this group, we agreed we'd work very closely with the hospital's volunteer director to make sure we were only making things that the hospital really needed. They are usually pretty well-stocked with volunteer-donated baby blankets, for example - and they can always use more. But we asked the volunteer director to seek out some needs in other departments, too. The geriatric nurses, in particular, were grateful to be asked! So we worked on one of their simple requests this evening.
We made more than a dozen simple drawstring bags, 18 inches square, that the nurses will use to cover patients' catheter bags. Nothing sweet like a baby blanket, and nothing particularly pretty...but I have to admit, if I were in the unfortunate situation of having to have a plastic bag of pee hanging on a pole next to me, I'd want something to cover it up, too!
We used cotton fabric we had on hand, including a few pastel bed sheets that someone had donated to the volunteer office. Just cut a strip about 18 1/2 inches by 38 inches (approximate)...fold right sides together, stitch 1/4-inch seams up the sides. Press under about a 1/4 inch around the top, then again to form a casing about an inch deep. Stitch the casing, leave a small opening, and run a strip of twill tape or cotton cording through...and you're done.
Only two main things to remember about a hospital project like this.
First: Don't just guess about what they might need. Ask. Get specifics. Make a prototype and get feedback before making more. In our case, 18-inch-square bags seemed awfully large, but the nurses said they worked perfectly for them...and the drawstring tops were easy to cinch closed. So when we made our bigger batch of bags tonight, we were confident they they'd be truly useful.
The other thing to remember? For this project, anyway....avoid yellow fabric. 'Nuff said.
When we started this group, we agreed we'd work very closely with the hospital's volunteer director to make sure we were only making things that the hospital really needed. They are usually pretty well-stocked with volunteer-donated baby blankets, for example - and they can always use more. But we asked the volunteer director to seek out some needs in other departments, too. The geriatric nurses, in particular, were grateful to be asked! So we worked on one of their simple requests this evening.
We made more than a dozen simple drawstring bags, 18 inches square, that the nurses will use to cover patients' catheter bags. Nothing sweet like a baby blanket, and nothing particularly pretty...but I have to admit, if I were in the unfortunate situation of having to have a plastic bag of pee hanging on a pole next to me, I'd want something to cover it up, too!
We used cotton fabric we had on hand, including a few pastel bed sheets that someone had donated to the volunteer office. Just cut a strip about 18 1/2 inches by 38 inches (approximate)...fold right sides together, stitch 1/4-inch seams up the sides. Press under about a 1/4 inch around the top, then again to form a casing about an inch deep. Stitch the casing, leave a small opening, and run a strip of twill tape or cotton cording through...and you're done.
Only two main things to remember about a hospital project like this.
First: Don't just guess about what they might need. Ask. Get specifics. Make a prototype and get feedback before making more. In our case, 18-inch-square bags seemed awfully large, but the nurses said they worked perfectly for them...and the drawstring tops were easy to cinch closed. So when we made our bigger batch of bags tonight, we were confident they they'd be truly useful.
The other thing to remember? For this project, anyway....avoid yellow fabric. 'Nuff said.
Sunday, February 12, 2006
Well, this was easy
Like most of the rest of the world, I've been fascinated by the whole blogging thing and its potential for sharing thoughts, getting input, and connecting with people in a whole new way. And after spending several weeks thinking about setting up my own, it took all of a couple of minutes to actually do it. So, here I am.
In my spare time, I spend many hours at my sewing machine churning out things to give away. Quilts, baby blankets, caps for chemotherapy patients....stuff like that. Now, let me say right away, that this is just a hobby. I love to sew, to quilt, to knit. The process itself is soothing, creative, inspiring, relaxing, satisfying. And fun. But how many quilts or knitted slippers can you really make for yourself? How many can you inflict on friends or family members who may or may not share your love of handmade things?
So a few years ago, I caught on to the fact that a whole lot of folks out there enjoy knitting and sewing and then donating their finished projects to various worthy causes. Hmmmm, I thought....what a neat thing to do! You get to enjoy a wonderful hobby and have all the benefits of spending many hours with pieces of fabric or balls of yarn, and create something useful and comforting. Then, you give it to someone who could really use a little of that comfort. Win-win!
And again, I emphasize....this is just a hobby. I say this because I've observed any number of folks who take themselves waaaaaay too seriously in this endeavor. Let's be realistic. A donated quilt is not going to change the world. It may, for a moment, bring a sense of comfort to a woman seeking refuge at a shelter...but it's not going to feed her or educate her so she can rebuild her life. Some hand-knit mittens may help keep a child on an Indian reservation a bit warmer for the winter, but they're not going to make a substantial difference in the way that child deals with the struggles that lie ahead of him.
So a weekend spent at the sewing machine cannot, and should not, replace the real service work that every community needs. The way we vote, the way we support agencies in our communities, and the way we apply our own leadership skills are the real ways to make a difference.
But we can do all that....and still sew.
I invite you to come along with me as I explore more opportunities and projects that can, in a small way, be useful to some of our fellow citizens on this planet.
In my spare time, I spend many hours at my sewing machine churning out things to give away. Quilts, baby blankets, caps for chemotherapy patients....stuff like that. Now, let me say right away, that this is just a hobby. I love to sew, to quilt, to knit. The process itself is soothing, creative, inspiring, relaxing, satisfying. And fun. But how many quilts or knitted slippers can you really make for yourself? How many can you inflict on friends or family members who may or may not share your love of handmade things?
So a few years ago, I caught on to the fact that a whole lot of folks out there enjoy knitting and sewing and then donating their finished projects to various worthy causes. Hmmmm, I thought....what a neat thing to do! You get to enjoy a wonderful hobby and have all the benefits of spending many hours with pieces of fabric or balls of yarn, and create something useful and comforting. Then, you give it to someone who could really use a little of that comfort. Win-win!
And again, I emphasize....this is just a hobby. I say this because I've observed any number of folks who take themselves waaaaaay too seriously in this endeavor. Let's be realistic. A donated quilt is not going to change the world. It may, for a moment, bring a sense of comfort to a woman seeking refuge at a shelter...but it's not going to feed her or educate her so she can rebuild her life. Some hand-knit mittens may help keep a child on an Indian reservation a bit warmer for the winter, but they're not going to make a substantial difference in the way that child deals with the struggles that lie ahead of him.
So a weekend spent at the sewing machine cannot, and should not, replace the real service work that every community needs. The way we vote, the way we support agencies in our communities, and the way we apply our own leadership skills are the real ways to make a difference.
But we can do all that....and still sew.
I invite you to come along with me as I explore more opportunities and projects that can, in a small way, be useful to some of our fellow citizens on this planet.
Subscribe to:
Posts (Atom)
